Setting Up SSL
Setting Up SSL
- Generate the
keyandcsrfile usingopenssl
sudo openssl req -new -nodes -keyout server.key -out server.csr -newkey rsa:2048
Generating a 2048 bit RSA private key...............................................+++..+++
writing new private key to 'server.key'
-----
You are about to be asked to enter information that will be incorporatedinto your certificate request.
What you are about to enter is what is called a Distinguished Name or a DN.
There are quite a few fields but you can leave some blankFor some fields there will be a default value,If you enter '.', the field will be left blank.
-----
Country Name (2 letter code) [AU]:COUNTRY_CODE
State or Province Name (full name) [Some-State]:PROVINCE_NAME / STATE_NAME
Locality Name (eg, city) []:COUNTRY_NAME
Organization Name (eg, company) [Internet Widgits Pty Ltd]:YOUR_ORGANIZATION_NAME
Organizational Unit Name (eg, section) []:YOUR_ORGANIZATION_UNIT_NAME
Common Name (e.g. server FQDN or YOUR name) []:*.YOUR_DOMAIN.com
Email Address []:YOUR_EMAIL
Please enter the following 'extra' attributes
to be sent with your certificate request
A challenge password []:An optional company name []:
- Copy content of
server.csr
-----BEGIN CERTIFICATE REQUEST-----AAAAB3NzaC1yc2EAAAABJQAAAQEAz20Kx8Y/j7+5gLr/VuvfWx6Ekp5xvtn47h2+73GZ+qXQ4//751BR5GiYYP7QEgwrUkQSJLQtxPJr5a4+hD611MUUOIm60qTgfKF+z0hOYBCpfxw+a3ZrV0dayK2DnwPfKHleSaZvlWcmP6haJcMqXsjhrBPvTHtG7ppcVf5WbmzBP168UJYh98NFOgjV0iuoatTJpCx5d/JizHE5oZS8O5FL5tPdnSD7ek/hjVG1p9mWJbe+0Q//OxTSxRZzCl3w5kZsfEpdEFBrO0v4V6olA4tF3taajJY9P1oaMt7h/DJi+utlHym6tx4hqr443RHNvbeQSWZMU5st4L7jq4bG8w==
-----END CERTIFICATE REQUEST-----
- Upload the
csrtoSSL ProviderAfter verifying the certificate success, download certificate bundle from SLL Provider There will be 2 file, one certificate file (random name), and one bundle/chain certificate (with ‘bundle’ name on it)
For Bitnami
- Go to apache config directory
cd /opt/bitnami/apache2/conf
Upload (via
gitor copy pastevim) the certificate and bundle certificate to config directory rename it withserver.crt, andserver.bundle.crtEdit the configuration
ssl
sudo vim bitnami/bitnami.conf
- Edit and adjust the certificate file
SSLCertificateFile "/opt/bitnami/apache2/conf/server.crt"
SSLCertificateKeyFile "/opt/bitnami/apache2/conf/server.key"
SSLCertificateChainFile "/opt/bitnami/apache2/conf/server.bundle.crt"
- Restart
apache
sudo /opt/bitnami/ctlscript.sh restart apache
For Google Bucket
- Go to
console.cloud.google.com
In order bucket to have https, we need to create Http(s) Load balancing pointing to bucket - Create Http(s) Load balancing by go to Network > Load balancing

- Choose Http(s) Load balancing > start configuration
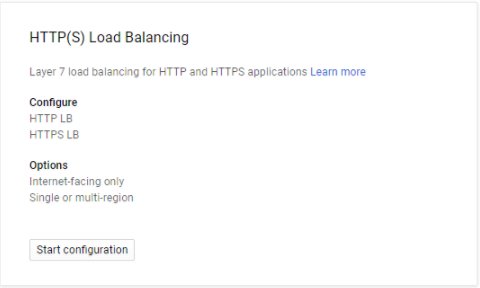
- Start the configuration
- On backend configuration choose bucket
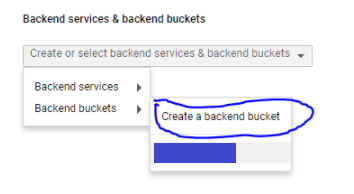
- Browse your target bucket and create.
- Click on next step “Host and path rules” leave it be, no configuration needed.
- Click on next step “Frontend configuration”`

- Click dropdown IP Address > Create IP Address
- On the “Reserve a new static IP address” give some descriptive name
- Add one front end and IP Port again

- Change Protocol to HTTPS and use the prev created IP address
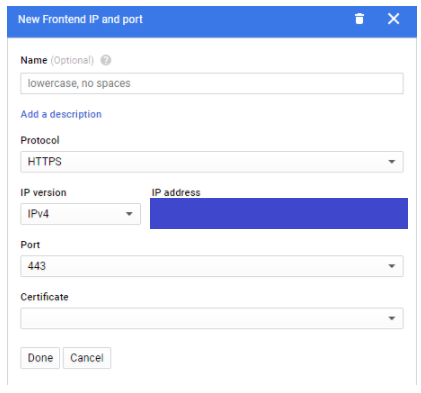
- On Certificate, click “Create a new certificate”
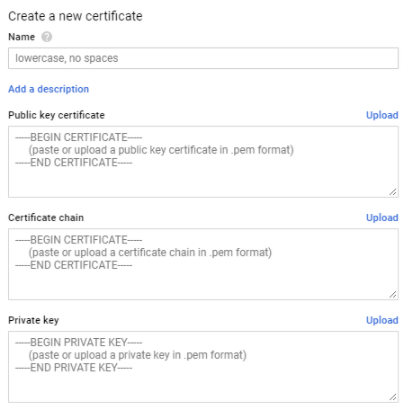
- Copy content of certificate (server.crt) to “Public key certificate”
- Copy content of certificate bundle (server.bundle.crt) to “Certificate chain”
- Copy content of private key (server.key) to “Private Key”
- Create the certificate info > done
- Click next step “Review and finalize”
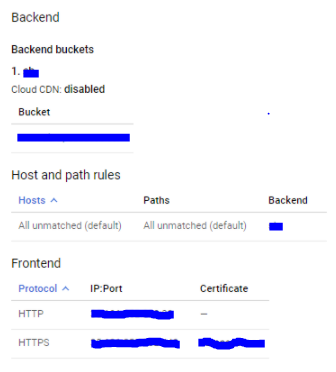
- Check the configuration
- Click create.